
As a regular Xcode user, I used to wonder a lot about Dashcode that comes bundled with it. At a first glance, it seemed like a workshop for osx dashboard widgets – which it is, but recently I learned it is a whole lot more.
Sometimes there’s a need to build some small websites for own projects, internal use and whatever. Using a huge CMS for everything seems a bit overkill, and coding everything from scratch with PHP would take too much time. Also, making everything work in a nice layout is apparently impossible for me. This is where Dashcode comes in.
Its main purpose is to help make Dashboard widgets and user interfaces that work inside Safari. That’s ok, if everyone you know uses Safari. All functions are built on top of javascript / html5 / css, which are standards, so stuff you make in Dashcode should work in some other browsers, too, eh?
I’ll try to write these small articles every now and then to demonstrate some of the features of Dashcode, including how to do things. The biggest problem with Dashcode is the lack of documentation. If you do a quick search on the web on how to do some specific function, the answer usually is “learn to use the debugger and figure it out”. Well I did that. Now it’s time to write down the stuff that you shouldn’t have to find out using a debugger. At the time I’ll be finished with these, they’ll probably publish a 900+-page manual that explains everything.
Data sources
Learning how to use data sources in Dashcode is essential. You can, of course, use jquery or some other library to fetch and organize your data, but as Dashcode comes with such a great feature, it would be just sad not to use it.

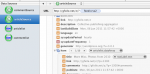
If you click on the circle-with-a-dot icon on bottom left of Dashcode, it’ll take you to Data source view. There you have, as a default, one data source, which has no defined feed. You’ll probably want to provide a feed. This stuff is actually documented, so I’ll skip the obvious parts. Now, let’s say you already read all that documentation and you have a real data source. Now you’ll want to update that other data source, based on a selection you’ve made from the first data source.
Now what comes to the data sources, you’ve probably noticed by now that they must reside on the same server you’re running the javascript app on. This is a security feature that’s been implemented into browsers and http servers to prevent malicious data from being sent from a third party. It’s a good thing. It also makes it more difficult to demonstrate anything. For my own projects, I normally use a server-side php script that makes an xml feed on-the-fly depending on the parameters.
To demonstrate this, I used the rss feeds provided by WordPress. One that contains all article and other that’s article-dependent and contains all comments for that article.


Now as you notice, the second feed contains a parameter that contains the article ID. We need to provide a valid feed to begin with if we want to draw the connections in the editor. This is a big minus in Dashcode. If you know a way around this, please leave a comment.
In the GUI editor side, I’ve created two lists to which the connections were drawn to. You can see the list data sources in the data source list, named “articlelist” and “commentlist”. From the article data source, the connection goes from the actual article list root node to the articlelist component dataSource property, and the article name goes to the rowLabel text property. Same goes with the commentSource and commentlist.

You’ll have to assign a function to the onClick event of the article list row. Select the row template from the list on the left, and from the inspector write an appropriate function name for the onClick event. Here I’ve chosen to name it onSelectArticle. You can call it whatever you want. It’ll make copypasting the code more difficult, though.
The actual magic happens inside the function.
function onSelectArticle(event)
{
    // We'll want the data source for the list, not for all articles.
    var alist = dashcode.getDataSource("articlelist");
    var csource = dashcode.getDataSource("commentSource");

    // Self-explanatory: we'll get the "link" value from "selection" // in the list data source, then split it by = and get the latter  // part (article ID).  var id = alist.valueForKey("selection").valueForKey("link").split("=")[1];

 // Set the parameter "p" in the feed URL to the id we just got.     csource.setValueForKeyPath(id,"parameters.p");
}
Now what happens is that when you click on the article list and select an article, the onSelectArticle function changes the commentSource feed url parameter accordingly and automatically updates the comment list control.
You can find the working example here. The zipped tutorial project is here.
Next time I’ll go into detail how to browse through a data source in a function without creating list controls.

Leave a Reply