This is quite easy to do, actually, just another case of bad (or missing) documentation.
First, get an ffmpeg binary. This can be done by either compiling it by yourself or googling for a ready compiled binary. If you’re on a Mac, you probably have it already, as many of the video converters from Mac App Store come with the ffmpeg binary hidden inside their directories. Just open a terminal, type:
cd /Applications
find . -name "ffmpeg"
…and you’re set. Copy the found binary to /usr/bin or wherever you want it.
If you’re on Windows, google for ffmpeg.exe, copy it anywhere and it’ll work, unless it doesn’t, which is pretty much a 50/50 possibility.
On Linux, using any repository system you use, install the package ffmpeg, only to realize it doesn’t support mp3, because mp3 is apparently not an industry standard.
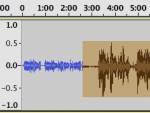
Not depending on if it’s a good standard or not, you’ve got 1072 mp3 files you’ve recorded for some reason, and they’re all too silent. By a factor of 10.
Go to the directory with the files, and type (example):
cd SilentMP3s
mkdir LouderFiles
for a in *.mp3; do ffmpeg -i $a -vol 2560 LouderFiles/$a; done
Now you’ll see a lot of text flowing through your terminal for a while, and when it’s done, you’ll find all of the files, 10 times louder in a subfolder named LouderFiles.
The ffmpeg -vol parameter amplifies the sound. The default value is 256 (no amplification), and you can adjust the number accordingly. Here it’s 2560, as it’s 10 times louder. Note that these are not decibel values or anything that sophisticated, but just an integer value. 512 equals to twice the volume, 768 three times, 1024 four times, etc.
The best way to find the correct amplification might be to look at the actual waveform in an audio editor, e.g. Audacity, and then try the amplification on one file. You’ll quickly see what is the appropriate value for the -vol parameter.


Leave a Reply